

"Petit à petit l'oiseau fait son nid."
“Little by little, the bird makes its nest.”
As a Peace Corps volunteer in Burkina Faso in the early 1980’s, I heard this expression so often it is burned into my memory. My West African colleagues explained it to me often: with patience and persistence, taking small step leads to achieving big goals.
I am reminded of this saying as I see enhancements large and small get added to Reveal 11 on a regular basis.
In today’s post, I am going to focus on some of the small steps, the little things that can make a big difference. (Of course, what might seem like a small change to a user still can mean a lot of work for the software development team!) Most of these changes were introduced with the recent Reveal 11.5 Release.
The changes I cover here are:
- Switch Between Light Mode and Dark Mode
- Select Language Preference
- Change Widget Order, Turn Individual Widget Display On/Off
- Hover for Document Counts
- Add the Grid to Your View
- Add Specific Documents from Grid to Search
Switch Between Light Mode and Dark Mode
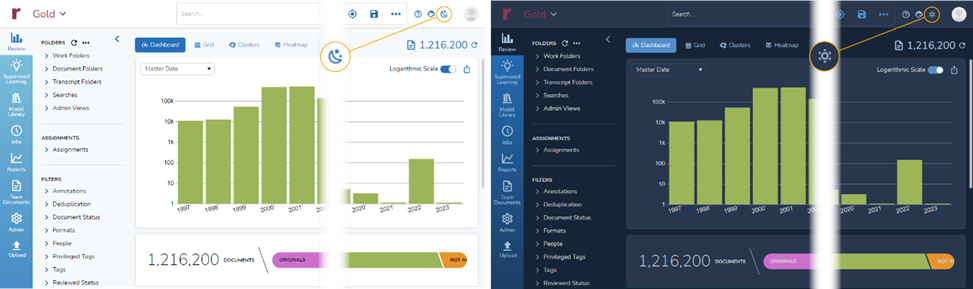
You have been able to switch between light model and dark mode for a while. Now you can do so with the click of a button.
To switch from light mode to dark, click on the moon-and-star icon in the upper right corner of the window. To switch from dark to light, click on the sun icon:
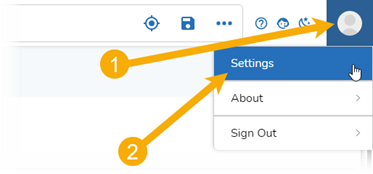
Select Language Preference
You can change the language displayed within the user interface.
To change the display language:
- In the upper right corner of the window, (1) hover over the silhouette and (2) select Settings:
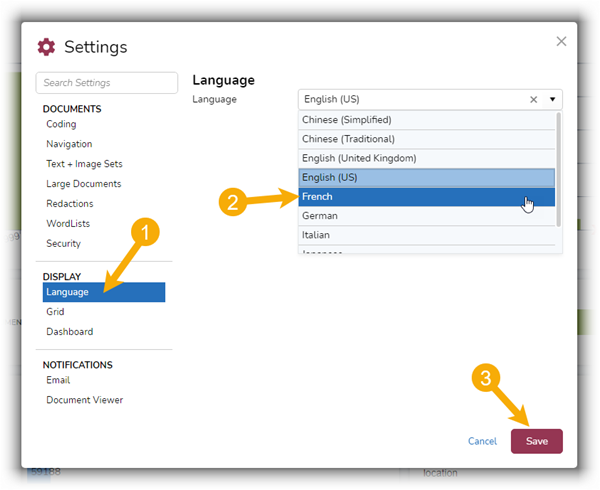
Now the user interface will be in the language you just selected:

Change Widget Order, Turn Individual Widget Display On/Off
You now have greater control over the widgets in the Dashboard.
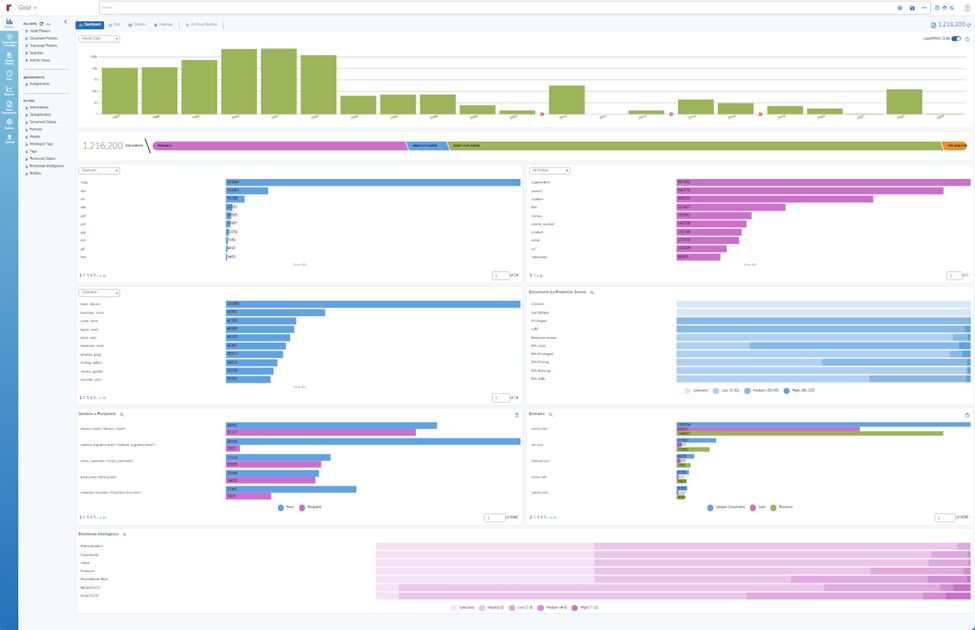
The Dashboard is the first screen that opens when you select a project. It is the control center of Reveal 11, the place where project data, visualizations, filters, search, and analytical tools all are available.
The main body of the Dashboard is where your widgets are located. The widgets’ default order is:
- Timeline
- Deduplication (the Candy Bar)
- Extensions
- Entities
- Custodians
- Documents by Predictive Scores
- Senders and Recipients
- Domains
- Emotional Intelligence
If I zoom out far enough, I can show all these widgets in a single screen:
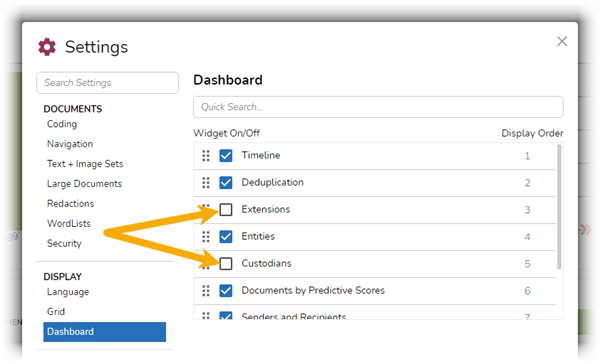
A new setting has been added that allows you to change the order of the widgets displayed on the Dashboard. You also now have the option of controlling which widgets are displayed in the Dashboard.
To control which widgets are displayed and the order in which they are displayed:
- In the upper right corner of the window, (1) hover over the silhouette and select Settings:

- From the options on the left, select Dashboard:

You can change the order in which the widgets display by (1) dragging a widget and dropping it into a new location or (2) entering a new number in the Display Order and then selecting Save:

You also can change which widgets are displayed. If you want to remove a widget for the dashboard, click on the check box to deselect it and then select Save:
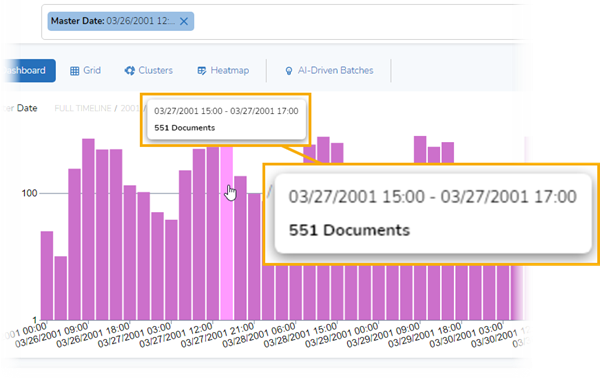
Hover for Document Counts
When you are at the Dashboard, document counts are now easier to see. To see counts and related information, just hover over any bar in any of the widgets.
Here are three examples.
Timeline
If you hover over a bar in the Timeline, you see the timeframe covered by the bar and the number of documents represented by the bar:
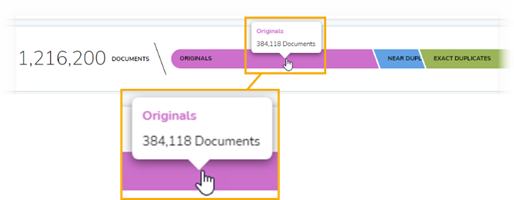
Candy Bar
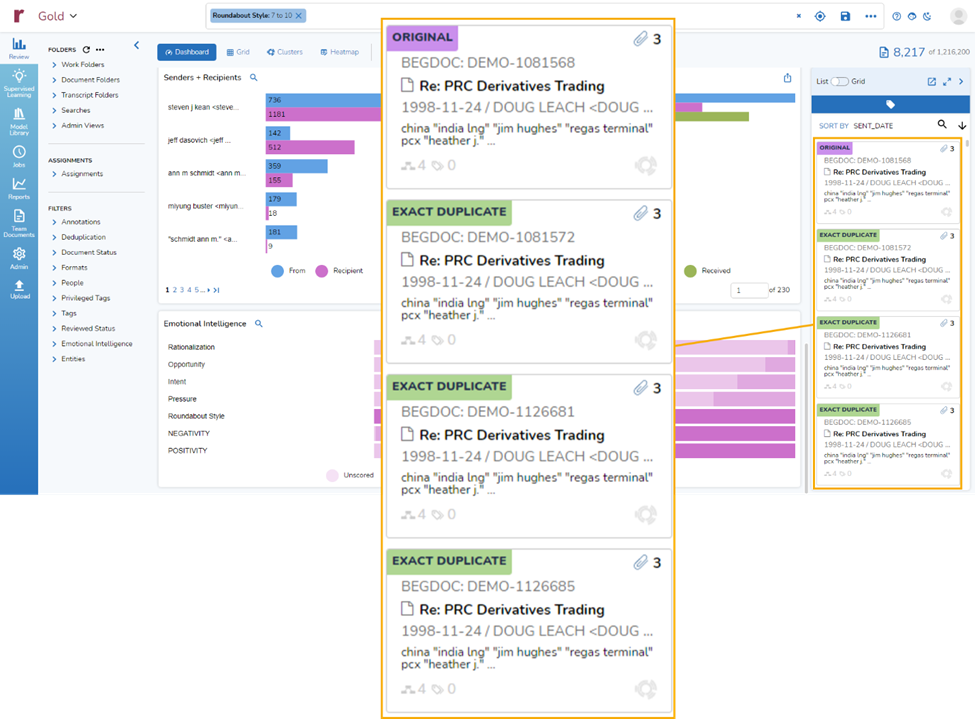
The Candy Bar is a graphical display of Originals, Near Duplicates, Exact Duplicates and documents Not Analyzed (not analyzed because they are encrypted, lack text, or contain excessive text) in the current view. If you hover over one of those segments, you see the number of documents in that segment:
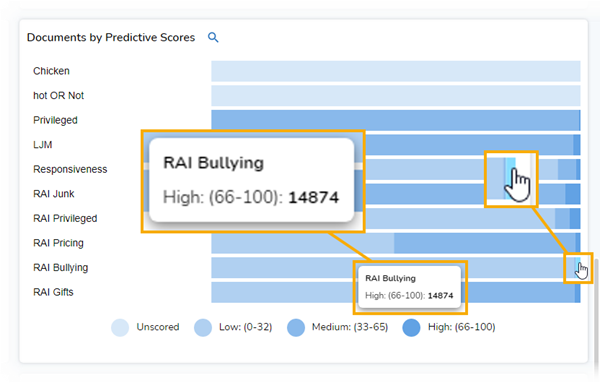
Documents by Predictive Scores
With Reveal’s supervised learning technology, you can create and train Classifiers to produce predictive scores for each document in your project, creating AI Models. You can reuse AI Models you created in other projects and stored in your Model Library, and you also can take advantage of pre-built AI Models available in the Model Library.
You can use the scores from AI Models in various ways, the most common of which is to prioritize documents for attorney review.
The Documents by Predictive Scores widget shows AI scores for each model in use. For convenience, the scores are shown in four groupings: Unscored, Low (0-32), Medium (33-65), and High (66-100).
To see the number of documents in any of those groupings, select a model and hover over the grouping:
Add the Grid to Your View
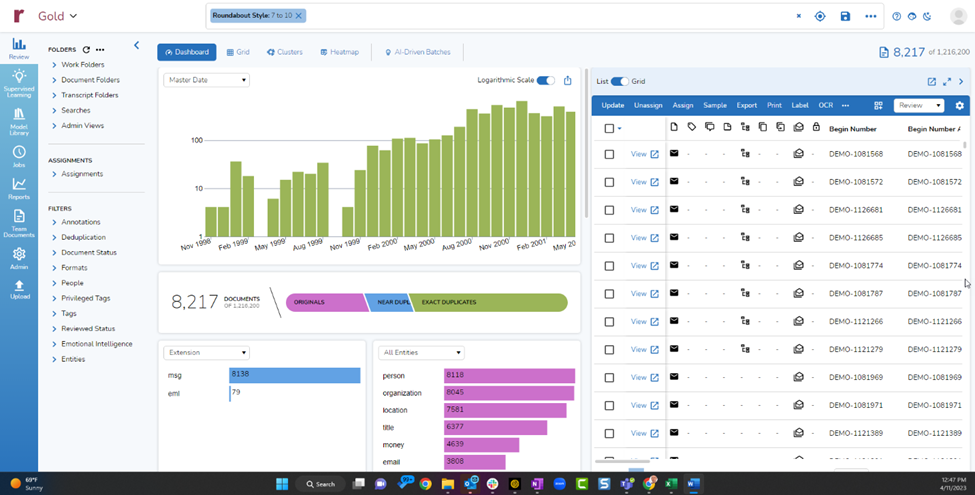
Reveal has four main views: Dashboard, Grid, Clusters, and Heatmap. If you are in the Dashboard, Clusters, or Heatmap view, when you perform a search then a Results Pane appears with a List View that shows cards for the top documents in the search.
In this example, I went to the Emotional Intelligence widget and clicked on the highest Roundabout Style grouping (with scores from 7 to 10). Roundabout Style is used to detect conversations that are unusually wordy and avoid addressing the point directly – this can be an indicator of, for example, attempts to commit fraud.
The main body of the window contains the Dashboard. On the right is the Results Pane with a List View:
If you click on any of the cards in the Results Pane, you are taken to the corresponding document.
If you switch to the Clusters or Heatmap views, the Results Pane persists:
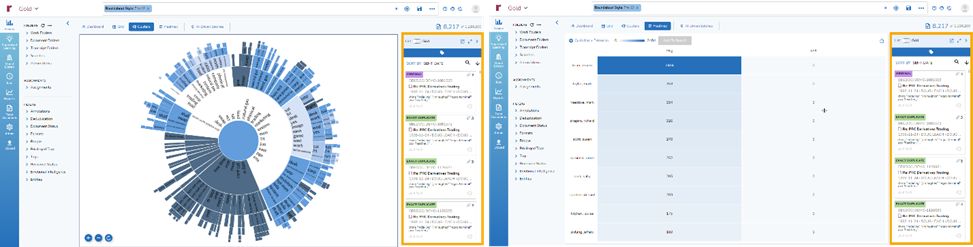
In any of these views, you can click on the List-Grid toggle to switch the Results Pane from the List view to a Grid view:
Now you have a side-by-side setup, with the Dashboard, Clusters, or Heatmap view on the left and the Grid on the right:
At this point, there are several new things you can do.
You can adjust the relative widths of the two views. Here, I made the Grid view wider, which automatically resized the content in the Dashboard view:
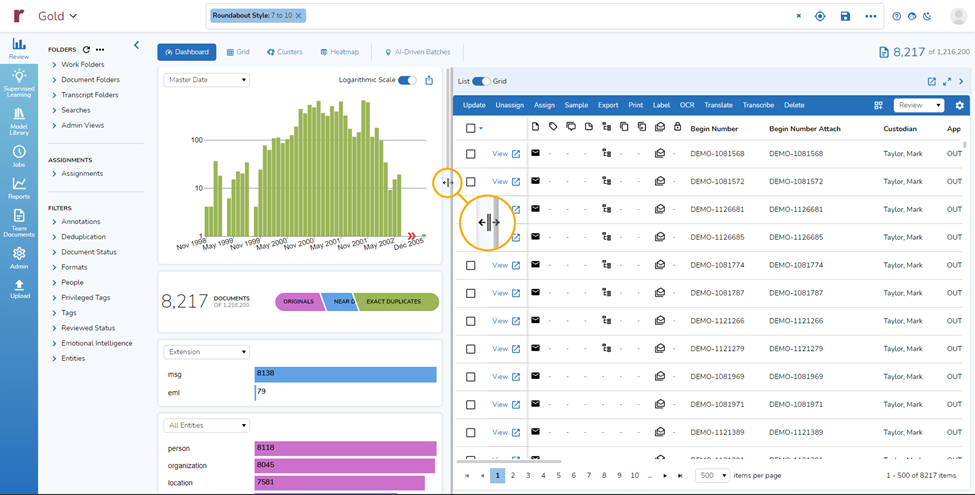
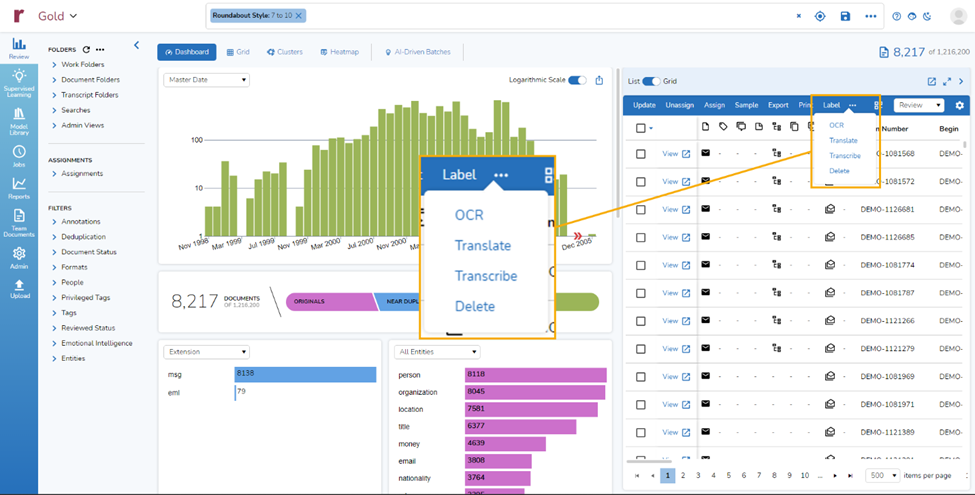
You can go in the other direction, making the Grid view narrower. As you do that, bulk action columns may disappear. When that happens, an ellipsis appears. If you click on the ellipsis, you get a dropdown list of the bulk action options, any of which you can select:
Add Specific Documents from Grid to Search
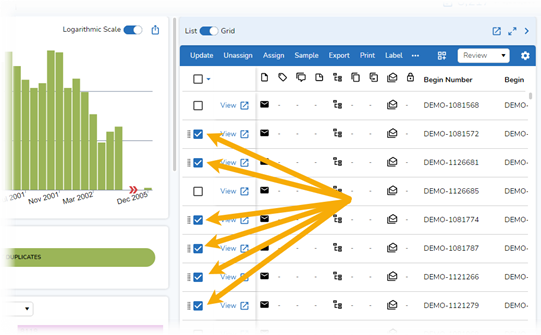
While running a search, you now can add specific documents from the Grid to your search.
First, select the documents in the Grid that you want to add. You have two choices. You can select all the documents on the page (you can display 25, 50, 75, 100, 250, or 500 documents per page). You do this by checking the box at the top of the list:
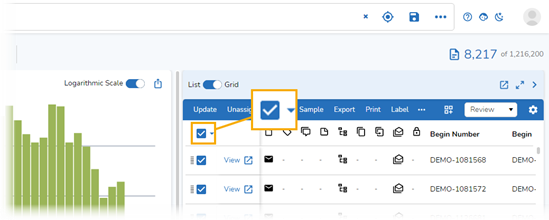
If you prefer, you can select individual documents by checking their boxes in the Update column:
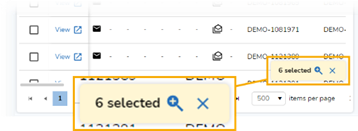
In the bottom right corner of the Grid, a popup will appear displaying how many documents you’ve selected. Click on the magnifying glass icon in the popup to add the selected documents to your current search:
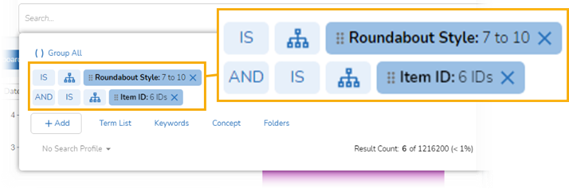
In Advanced Search, you now can see the initial Roundabout Style search with the added search for the six selected documents:
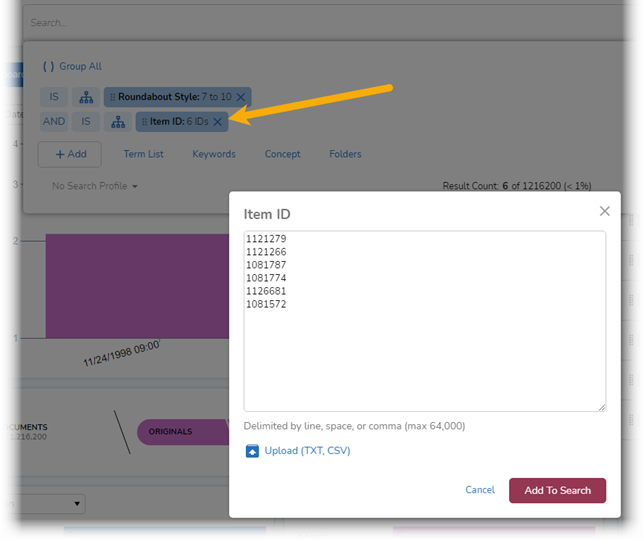
If you click on the added search pill, Item ID:6 IDs, you can see a list of the added documents:
And There’s More
What I showed today are just a few of the recent enhancements to Reveal 11, additions that help you enjoy the highest quality speed to insight in the industry.
For more information about how Reveal can empower your organization, contact us.