

This post is about pictures – image recognition and classification, to be specific. First, some context. If it seems my recent string of posts has been all-in on AI, that is right. A common thread running through these posts has been a focus on the practical application of artificial intelligence and machine learning to solve long-standing eDiscovery challenges.
I started by discussing some of the underlying challenges in eDiscovery Market Trends That Can No Longer Be Ignored and 7 Signs It’s Time to Upgrade Your eDiscovery Solution.
From there, I laid out an AI framework and potential benefits that can accrue from the effective use of AI, first in Legal AI Software: Taking Document Review to the Next Level, AI in the Legal Sector – the Obvious Choice and then in After 15 Years, Has the eDiscovery EDRM Model Been Realized?
Next, I turned to specific challenges and how applied AI can address them. In How Many Hurdles are in Your Foreign Language Document Review Process?, I looked at how AI can be used for translation.
Which takes us back to the pictures, and AI. With Reveal Version 9.2, released in June, new image detection technology uses machine learning algorithms to identify and apply labels to images to facilitate search and filter without looking at every image. With this approach, you can automate a process that when done manually is deemed by many to be impossibly expensive.
The Problem: Too Many Pictures and No Viable Way to Work with Them
When it comes to pictures and eDiscovery, there long has been a problem.
Pictures such as photographs, drawings, and logos have been part of the data available to be gathered up and used for discovery purposes since the early days of eDiscovery.
When analyzing and reviewing discovery materials, however, there has been no viable options. There has not been a cost-effective way to work with pictures; to get a sense of what content your pictures contains; or to find pictures you are looking for, especially when you did not know they were part of your ESI corpus.
As a result, many attorneys and allied professionals long have opted to take a pass on pictures unless they knew exactly what they were going after, had only a few pictures they needed to work with, or had an urgent need combined with a substantial budget.
The Possibilities
We know the problem. What if you had tools that solved that problem? Imagine you had technology at your fingertips that:
- Let you easily identify pictures, whether you are dealing with 10,000 discovery documents or 10 million;
- Automatically tagged objects, events, and concepts in those pictures; and
- Enabled to you search for those tags just as you search for anything else?
Assume you had those tools. What would that mean?
Burden goes down: Because the cost to search for relevant pictures would drop precipitously, no longer would you need to pretend pictures did not exist. Instead, you could add them to the ESI available to you as you conducted your investigation or built your case. On the flip side, because the burden of working with the pictures would be so much less, no longer would you have that shield to hide behind.
Access goes up: You finally would have access to pictures in a meaningful way. As you built a figurative picture of what happened, you could easily be able to draw on actual pictures.
If you were working on a matter where the plaintiff alleged lower-back soft-tissue injuries that prevented him from lifting heavy weights, you could search electronically stored information (ESI) for photos of him carting large boxes, throwing children in the air, or working out at the gym.
If you were handling a failure-to-warn products liability lawsuit, you could search for warnings in advertising materials, using image tags like “advertisement”, “poster”, “flyer”, and “brochure”.
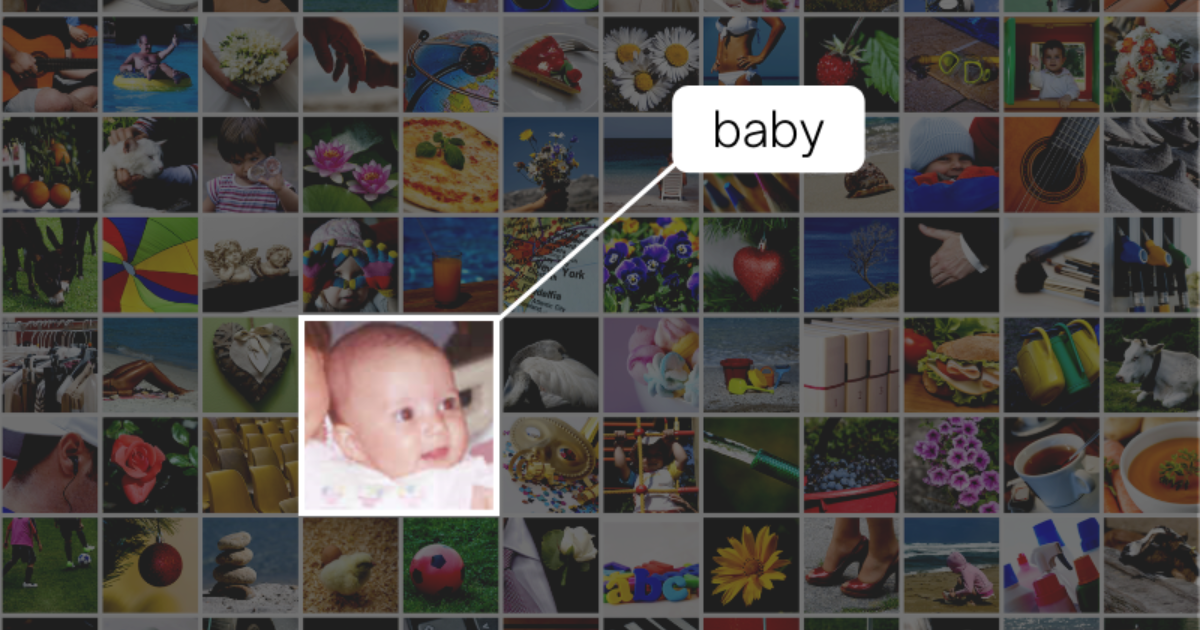
If a regulatory agency were investigating your client in response to a whistleblower complaint implicating the company’s product in sudden infant deaths, you could search for pictures with image tags such as “baby”, “newborn”, “cradle”, and “blanket”.
The Solution: Image Recognition, and Classification
There is a viable way, available today, to tackle the picture problem. Take it on with artificial intelligence. Use algorithms, not keystrokes; look with computer vision, not just with eyeballs.
Reveal delivers these capabilities by integrating Amazon Rekognition into its platform and building on what Rekognition offers. Rekognition is a deep learning tool that uses a combination of feature abstraction and neural networks to analyze billions of images daily.
Rekognition as deployed by Reveal differs significantly from machine learning as commonly used for lawsuits and investigations. It differs from supervised machine learning – what the legal industry refers to as “predictive coding”, “technology-assisted review”, “TAR”, “active review”, and the like. It also differs from unsupervised learning such as concept clustering. While the two approaches (“traditional” machine learning versus image recognition) share common roots, they look at different content and take fundamentally different approaches to attacking that content.
Let’s explore that, starting with the first stage in the evolution of these capabilities, TAR; continuing with the second stage, reusable AI models; and concluding with the third and most recent stage, image recognition.
Stage One: Traditional Machine Learning Delivered as TAR
Let’s look at a typical TAR exercise. A lawsuit has been initiated. The team has preserved, collected, and processed discovery data. This data, this ESI, likely is a mix of communications, mostly email but increasingly including social media content and chat and other short messages; office files such as Word documents and Excel spreadsheets; databases and other structured content; and pictures such as photographs, drawings, logos, and video footage. The team has done some culling to identify and set aside ESI that obviously will not be of interest. Then the team takes on the remaining data.
The team loads its data into a TAR system, or points TAR tools at the ESI wherever it currently resides. At this point, the team probably has no history to draw on, neither earlier analyses of the ESI nor earlier analyses of other data. The team tries to define what it is looking for. Perhaps it already has some exemplars – maybe some email messages already identified as important, possibly a made-up document that contains the key elements the team hopes to find. The team tells the TAR platform, “These are things I think are important, find more like them for me.”
Applying its algorithms to the exemplars and the ESI, the systems returns to the team documents from the corpus which it thinks share key characteristics with the exemplars. The system prioritizes the results, putting the most similar up front. Team members start going through the results. They give each document a thumbs up (“That’s the type of thing I am looking for”) or a thumbs down (“Not so interesting, let’s move on”).
The system learns from each of these thumbs up / thumbs down decisions, and with what it learns re-evaluates and re-prioritizes the remaining content.
This TAR exercise is largely self-contained. The team and the platform start with a blank slate, a clean page. As the team and platform move through the ESI, they develop a better understanding of what it contains and what that content means.
This approach makes good sense and is a powerful tool for many things we do as we conduct investigations and handle lawsuits. That is why Reveal and others offer TAR capabilities, as discussed in earlier posts such as AI in the Legal Sector – the Obvious Choice and Legal AI Software: Taking Document Review to the Next Level.
While this approach works with many types of content, it does not help much with pictures. With TAR there is no object detection, no image classification, no recognition system that locates pictures, identifies objects, events, and concepts in the images, and returns text describing those items.
Stage Two: Reusable AI Models
The next step toward a successful image recognition solution (but still not the solution itself) is to build on prior experience. Reveal accomplishes this with out-of-the-box, pre-trained NexLP AI models built by our team of data scientists and available at Reveal’s AI Model Marketplace.
Each NexLP AI model acts as a container of features. Features represent the collection of past knowledge the model has learned and are continually built upon, as described in How NexLP’s AI Models are Built. The models are designed to be reused across multiple matters, building upon knowledge from one matter to the next.
The image detection and recognition capabilities used by Reveal take that approach to another level, benefiting from on-going daily analyses of billions of images.
Stage Three: Image Recognition
How does this work, in practice?
Reveal’s platform identifies files that appear to contain pictures. You can direct the platform to go through all documents in your population, searching for images. If you prefer, you can manually designate specific documents to process.
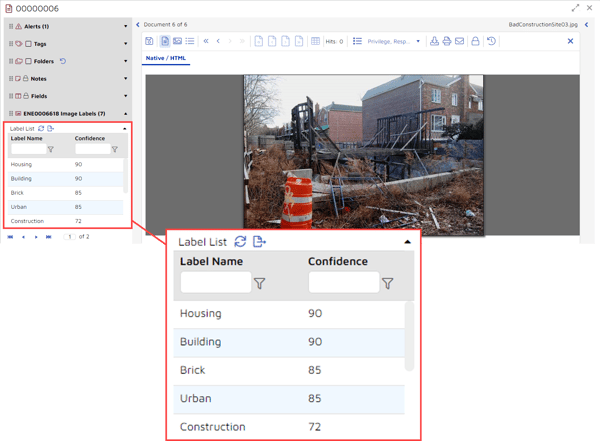
The system deploys deep learning technology and training already done on billions of images to analyze the pictures it found. It attempts to identify objects, events, and concepts in the images. For each object, event, or concept the platform identifies, it returns one or more labels. For each label, the system also provides a confidence level. In the example below, the platform returned 10 labels with corresponding confidence levels: Housing, 90%; Building, 90%; Brick, 85%; Urban, 85%; Construction, 72%; Construction Crane, 67%; Soil, 66%; Demolition, 65%; Neighborhood, 58%; and House, 57%:
As part of Version 9.2 of Reveal’s platform, image recognition is available across all of Reveal’s deployment models: cloud, on-premise, hybrid, and mobile.
Image Recognition in Action
For this post, I deployed Reveal’s image recognition capabilities against a sample dataset of 15,757 documents.
I opted to have the platform find and label all images. The platform located 277 picture files with seven different extensions, .bmp, .gif, .jpeg, .jpg, .png, .tif, and .tiff.
The platform analyzed those files, identifying a total of 1,917 objects, events, and concepts. It entered each object, event, or concept in the database as a label.
The 277 picture files contain a total of 1,917 labels. The number of labels per document range from one to 28, with an average of 12.
There are 331 unique labels. Of those, the most common label, “Text”, appears 141 times, followed by “Paper” at 60 times and “Advertisement” at 53. Forty-one labels appear 10 times or more; 290 appear fewer than 10 times; and 141 labels appear only one time, labels such as “Banister”, “Forest Fire”, and “Senior Citizen”.
Step One: Labeling Your Images
As suggested above, you can choose whether you would like the platform to find and label all images automatically, or whether you would prefer to select specific images that you then will direct the platform to label.
Labeling All Images
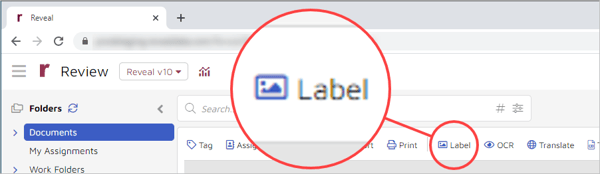
If you want to label all the images in your set of data, you can start at the main Review space. Go to the menu bar along the top and select “Label”:
This will open a pop-up window:
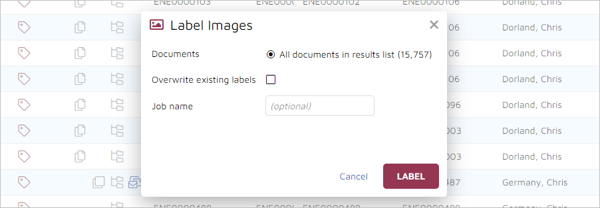
In the pop-up window, “All documents in result list” will be pre-selected and will show the number of documents in your set. You will be given the option of overwriting existing image labels as well as the opportunity to assign a name to the labeling job. To start the job, click on the “LABEL” button.
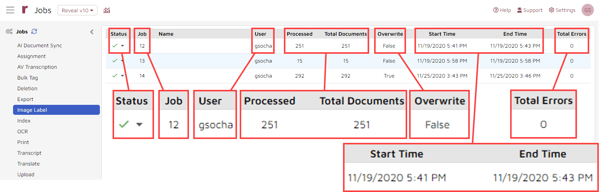
To check on the status of the job, click on the abacus menu icon (1) and then select “Jobs” (2):
From the list of job types, select “Image Label” and image labeling jobs will be displayed. You will see the status of your job; the number assigned to it; a name, if you entered one in the pop-up window; the user who ran the job; the number of documents processed as of the time you checked the status; total documents processed; whether you had the job overwrite previous labels; the start and end times of the job; and the number of processing errors, if any:
Labeling Selected Images
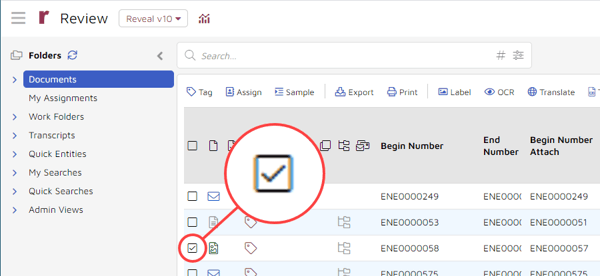
You can opt to label only specific images. To do that, start by selecting only those images that you want to label by clicking in the checkbox for each document:
As above, select “Label” from the menu bar. The pop-up window that appears will give you the choice of labeling only those images you selected or labeling all images in your document population:

Step Two: Working with Labeling Information
The “Image Labels” Field
Once the image labeling job is done, you will find the image labels in your database in a field called “Image Labels”. You can get to that content several ways. I will cover just a few of those here.
The Review Space
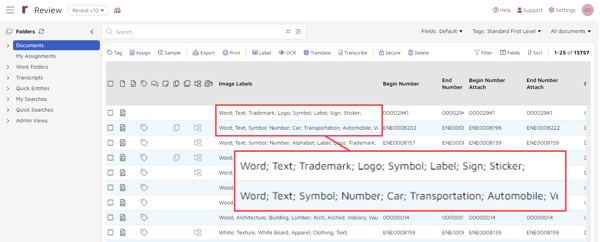
One way to get to and work with labels in via Reveal’s main Review space. In the example below, I rearranged the order in which fields are displayed so that the “Image Labels” field is the first one shown. Then I sorted documents by the “Image Labels” column so that entries for documents with content in the “Image Labels” field are displayed at the top of the list:
You can work with the labels just as you would with other fielded data. Here are two examples, using a filter and refining a search.
Using a Filter
From the main Review space, you can filter by image label.
- Select “Filter” from the top of the screen, which displays a filter icon to the right of each field;
- Click on the filter icon for the “Image Labels” column;
- Select the filtering mechanism you would like to use: Is like; Is not like, Starts with, Does not start with, Contains, Does not contain, Has any, Has none, or Has all;
- Enter the value to filter on; and
- Click on the “FILTER” button:
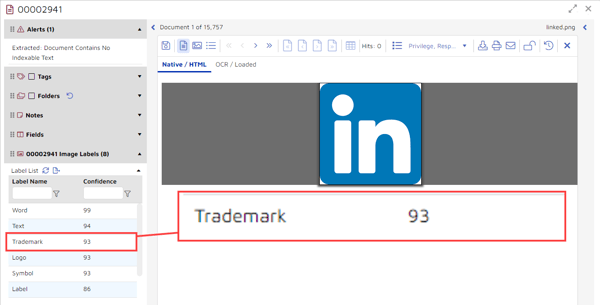
For this exercise, I selected “Contains” and entered “Trademark” as the value. Here is the first document from the results list, with the label “Trademark” having a 93% confidence level:
Refining a Search
For greater control, you can refine a search. To do this, start by clicking on the abacus menu icon on the right side of the search box. This will open a window with additional search options:
Click on the “Field” button (1) and scroll to the field you want searched (2). For this example, I selected “Image Labels Over 95”:
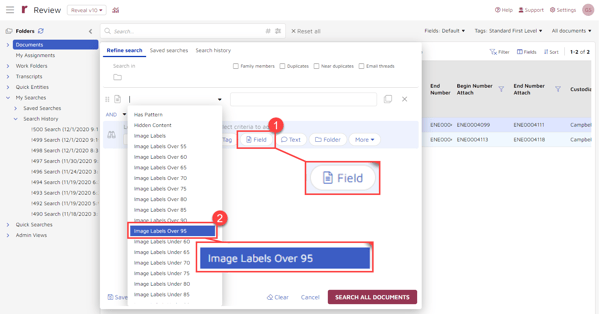
In the popup window, I selected “Contains” (1) and then from the list chose “Bulldozer” (2) as the value to search for. Instead of using the list, I could have started typed in a value (3). I also could have selected more than one value to search for (4). After making my selections, I clicked “SAVE” (5) and “SEARCH ALL DOCUMENTS” (6):
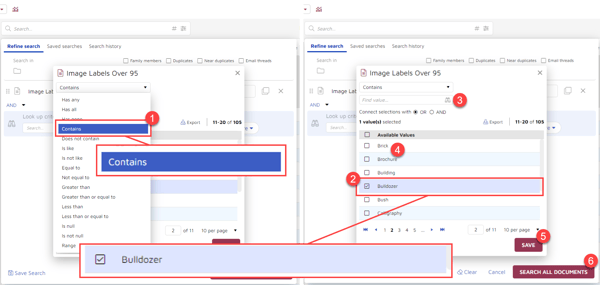
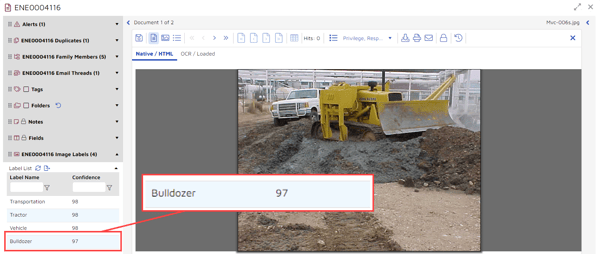
I got two results back, both with “Bulldozer” at a 97% confidence level:
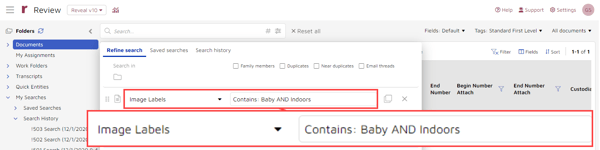
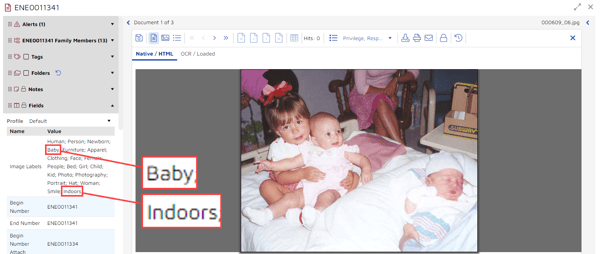
You also can search using more than one value, either with an “AND” or an “OR” connector. Here, I searched for documents whose image labels contained “Baby AND Indoors”:
If your organization is interested in leveraging the power of legal AI software to work with images, contact Reveal to learn more. We’ll be happy to show you how our authentic artificial intelligence takes review to the next level, with our AI-powered, end-to-end document review platform.
